
If you’re like most special educators I’ve worked with, you’re always looking for ways to differentiate instruction without creating a million different materials. And if you’re working with students at different skill levels—from those just learning to complete tasks independently to those ready to practice discrimination skills—you need activities that can grow with them.
The best part? You can use one set of file folder activities and progress students through multiple skill levels without starting from scratch each time.
Summary:
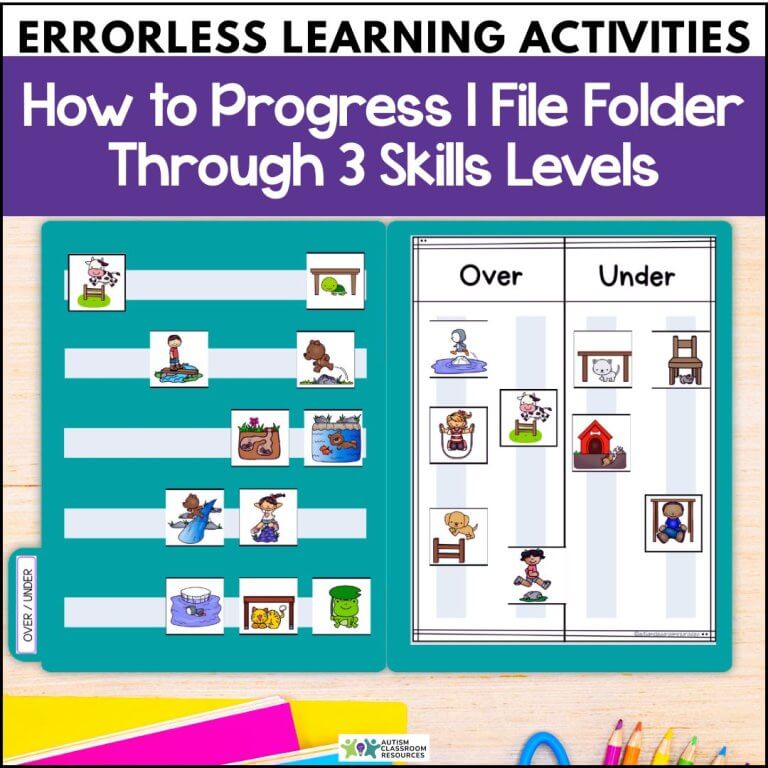
This post explains how to use errorless learning activities (e.g., a file folder activity) across three distinct skill levels. You’ll learn how to set up folders for beginning independent work with just one sorting option, progress to teaching discrimination skills through direct instruction, and finally move to independent practice for maintenance. Includes practical strategies for implementation and when to move between levels.
Table of Contents
What Makes File Folders Perfect Errorless Learning Activities?
File folders offer a structured, predictable format that’s ideal for errorless teaching. The materials are self-contained, the task is clearly defined, and you can easily adapt them to different skill levels without creating entirely new activities.
Plus, file folders are portable and can be used across different settings—at a table during direct instruction, in an independent work system, or as part of work tasks in a para-run station. They’re one of those tools that just make differentiation easier.
The 3 Skill Levels: From Single Option to Independent Practice of Discrimination
Here’s how to take one file folder activity and use it across three distinct skill levels. Each level represents a different instructional purpose, from building independence skills to teaching discrimination to maintaining mastery.
Level 1: Single Option for Early Independence
At Level 1, you’re not teaching discrimination yet. You’re using errorless learning activities. In other words, you’re building the fundamental skill of completing an independent work task. The student just needs to know “put the pictures on the velcro.”
How to set it up:
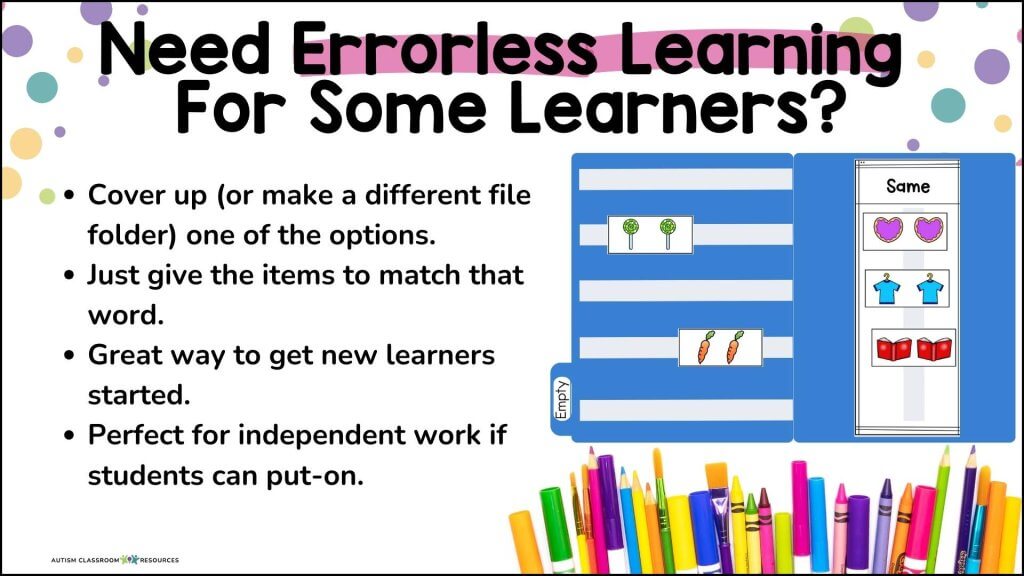
Take your file folder and cover one of the sorting options completely. Or create a separate folder with only one choice visible. For instance, if you have a same/different folder, you would only show the “same” side.

The student’s job is simple: pick up the cards and put them on the available velcro spots. Every card goes in the same place. There’s no decision-making required, which means the student can be successful even with limited skills.
Why this matters:
Many of our students struggle with independent work systems. They need to build the stamina and understanding that “I can complete a task without constant adult support.” This level gives them that experience without the cognitive demand of making choices.
Example with sorting activities:
Using a same/different sorting folder, you would cover or remove the “different” side entirely. All the picture cards go onto the “same” section. The student doesn’t need to look at the pictures or make any decisions—they’re just practicing the motor task of completing the folder.
This setup works perfectly in an independent work system or a structured work task rotation. The student can be successful without adult support, which builds confidence and work completion skills.
Level 2: Teaching Discrimination with Direct Instruction
Once the student can reliably complete single-option folders independently, it’s time to teach the actual discrimination skill. This is where the instructional work happens, and you’ll use direct teaching strategies.
How to set it up:
Now both sorting options are visible on the file folder. You’ll work one-on-one with the student using discrete trial teaching, errorless learning strategies, and/or other direct instruction approaches.
This is teaching time, not independent practice time. You’re sitting with the student, presenting cards systematically, and using errorless learning strategies to teach the discrimination.
Instructional strategies to use:
Start by teaching the student to sort just one type first. For same/different, you might present only “same” cards and teach them to put those on the correct side. Once they’ve mastered that, introduce “different” cards.
You can use immediate prompting (pointing to the correct location before they place the card) or use a most-to-least prompting hierarchy. The key is that you’re actively teaching and providing feedback on every trial.
Example with sorting activities:
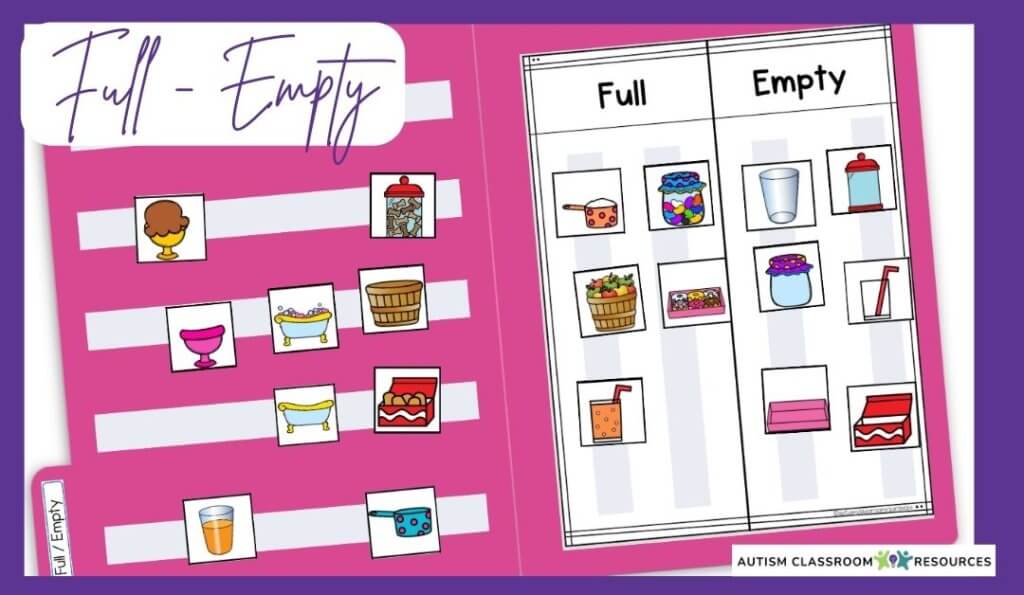
With the quantity sorting task, you might start by teaching “full” / “empty” since those are visually very different. Present a card, provide a prompt if needed, give specific feedback (“Yes, that’s full!”), and move to the next trial.
You’re collecting data on their accuracy, adjusting your prompting based on their responses, and systematically teaching them to discriminate between the two options. This might take several sessions or even weeks depending on the complexity of the discrimination.
Taking data during Level 2:
Track how many trials they complete correctly with and without prompts. This data tells you when they’re ready to move to Level 3. You’re looking for consistent accuracy (usually 80-90% or higher) across multiple sessions.
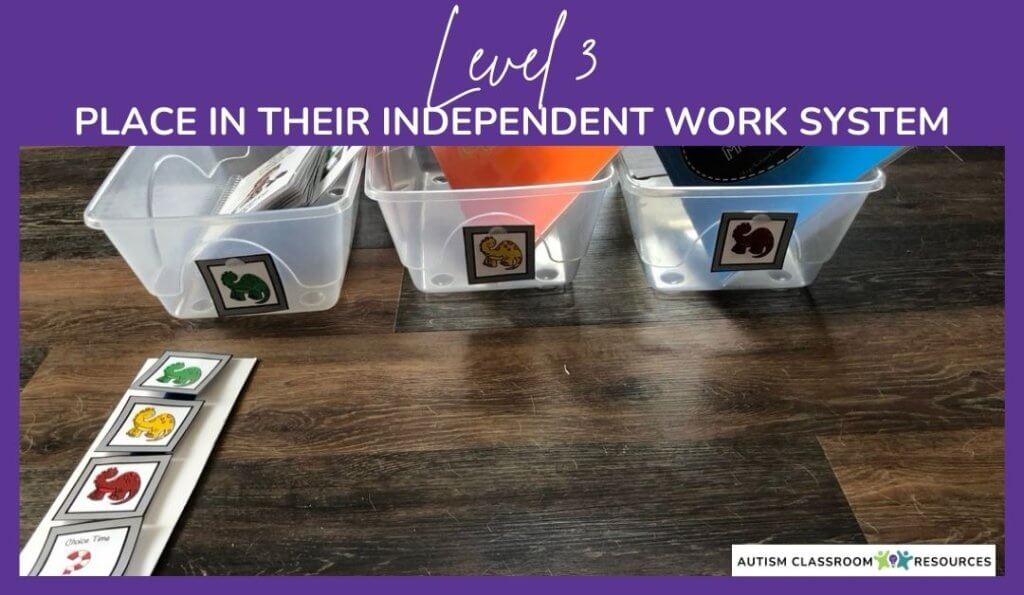
Level 3: Independent Work for Practice and Maintenance
Level 3 is where the file folder moves into your independent work system for practice and maintenance. The student has learned the skill during direct instruction, and now they need opportunities to practice it without constant adult support.
How to set it up:
The file folder looks exactly like it did in Level 2—both sorting options are visible. But now instead of sitting with the student for instruction, you’re giving them the folder to complete on their own.
This might be in an independent work bin, part of a task rotation, or during a structured independent work period. The student completes the entire folder without prompts or assistance.
Your role at Level 3:
You’re checking for accuracy after completion and providing reinforcement for correct work. If you notice consistent errors, you might need to move back to Level 2 for a quick refresher session.
Example with sorting activities:
The student gets their sorting file folder in their independent work basket. They complete all the cards, sorting them into the two categories. When finished, they either self-check or bring it to you for review.
At this level, the goal is fluency and maintenance. The student practices the skill they’ve learned, building automaticity and keeping the skill sharp.
When to Move Between Levels
So how do you know when it’s time to move from one level to the next? Here are some guidelines that work well.
Moving from Level 1 to Level 2:
When the student can consistently complete single-option folders (i.e., errorless learning activities) independently for several days in a row, they’re ready for discrimination training. Look for the ability to complete the folder with 100% accuracy and that the student has mastered the prerequisite skills of learning readiness (e.g., following directions).
Moving from Level 2 to Level 3:
Once the student demonstrates 80-90% accuracy or higher across 3-5 consecutive direct instruction sessions, they’re ready for independent practice. At this point, they understand the discrimination and just need practice to build fluency.
Moving back a level:
If a student’s accuracy drops significantly in Level 3 independent work (below 70-80%), bring the folder back to Level 2 for re-teaching. This isn’t failure—sometimes skills need more direct instruction time before they’re ready for independence.
Also watch for signs of prompt dependency. If a student won’t attempt a Level 3 folder without looking at you first, they might need more practice at Level 2 with systematic prompt fading before moving to full independence.
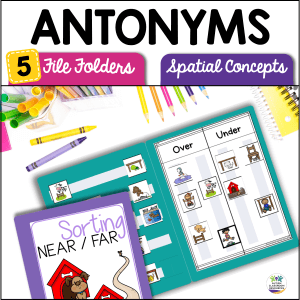
Real Example: Same/Different Sorting Across 3 Levels
Let me walk you through a concrete example using a same/different sorting folder from this set of file folder activities.
Level 1 setup:
Create the folder that only shows the “same” category. You can do this by covering the “different” side with construction paper or by making a separate single-option folder. Put out picture cards—some that match and some that don’t—but all of them go onto the single visible option.
Marcus, a student just learning to work independently, gets this folder in his work bin. His job is to put all the cards on the velcro. He doesn’t need to look at the pictures or make decisions. He’s practicing work completion and building independence skills.
After two weeks, Marcus reliably completes these single-option folders every day without adult support. He’s ready for Level 2.
Level 2 setup:
Now both “same” and “different” sides are visible. You sit with Marcus for 10-15 minutes daily using discrete trial instruction alone or in small group. You present cards one at a time with potential matches on the table of 3-5 cards. Then say, “Show me same” or “Where does this go?”
Initially, you point to the correct location before he places each card (errorless learning). Over several sessions, you fade your prompts as he becomes more accurate. You’re collecting data on every trial.
After three weeks of direct instruction, Marcus is sorting with 90% accuracy with minimal prompting. He’s ready for Level 3.
Level 3 setup:
The same/different folder goes into Marcus’s independent work rotation. He completes it on his own during independent work time, and you check it when he’s finished. He’s maintaining the skill he learned during instruction.
Meanwhile, you might start a new folder (like quantity sorting) at Level 2 to teach the next discrimination skill.
Setting Up Your Folders for Success
Here’s the practical part: How do you actually manage this system with multiple students at different levels?
Organization tips:
Keep Level 1 (errorless learning activities) folders in a separate bin or marked with a colored dot. These are your “independence building” folders that have only one sorting option. At first you might store them in a para-run center area. Then, once students pass level 1 with the errorless folders, you could put them in their independent work system to practice while you are teaching the discriminations in Level 2.
Store Level 2 folders near your direct instruction area. These folders are actively being taught and need adult support, so keep them where you do your one-on-one or small group teaching.
Once Level 2 is mastered, you can move the folders to the independent work area. These are ready for this student’s independent work bins at Level 3. These are the “practicing and maintaining” folders that students can do without help.
For paraprofessionals and staff:
Create a simple key or guide explaining the three levels. Staff need to know that Level 1 (errorless learning activities) folders go to students working on independence (no teaching required), Level 2 folders are for direct instruction time only, and Level 3 folders are for checking after independent completion.
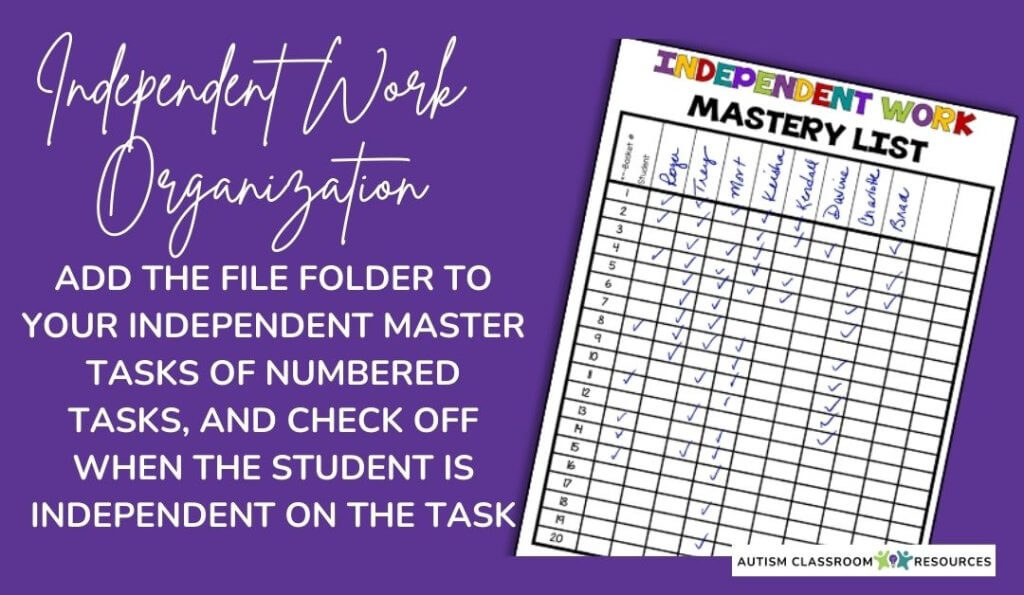
Or better yet use my organizational toolkit for independent work and add them to the master list and check off the skill as mastered.
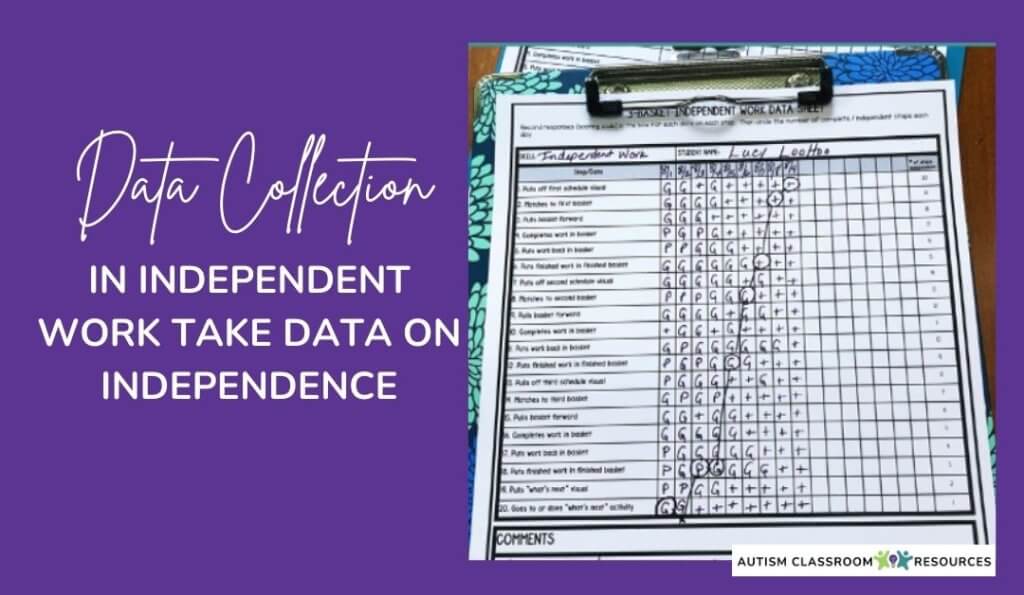
Tracking progress:
Typically you’ll use a discrete trial type of form to track data while you are teaching, like the one below. For independent work, don’t forget to put the folders on the students’ mastered list. See this post for more on how I organize materials for independent work.
Making Multiple Skills Work Simultaneously
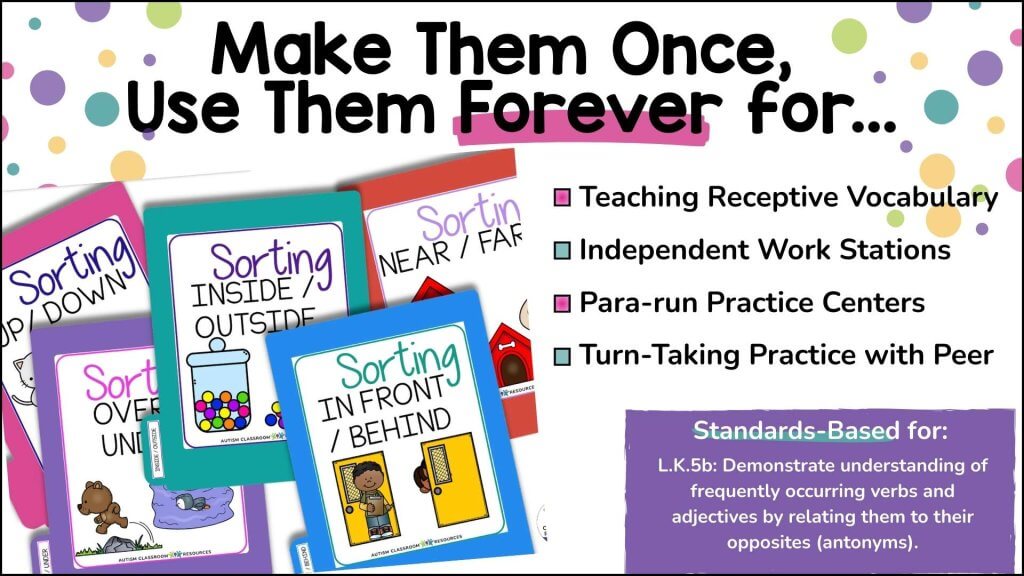
The beauty of this system is that one student can be at different levels for different skills. Marcus might be at Level 3 for same/different while still at Level 1 for quantity sorting.
This is where having multiple sorting activities in one set becomes invaluable. You can differentiate both by instructional level and by content difficulty without creating entirely new materials.
A student masters same/different discrimination? Move that folder to Level 3 for independent work and maintenance, and start teaching some/none sorting at Level 2. As they progress, you have multiple sorting concepts ready to teach at each level.
Common Questions About This Using Errorless Learning Activities
“How long should a student stay at each level?”
It varies by student and skill complexity. Some students might spend 2-3 weeks at Level 1 building independence skills. Others might be ready to move to Level 2 after just a few days. Let the data guide you.
“Can I skip Level 1 if my student already works independently?”
Absolutely. If a student already has solid independent work skills, start them at Level 2 for direct instruction. Level 1 is specifically for students who are still learning to complete tasks without constant adult support.
“What if accuracy drops in Level 3?”
Move back to Level 2 for re-teaching. Sometimes students need more direct instruction time before a skill is truly independent. That’s completely normal and not a sign of failure.
Looking for Ready-to-Use Activities?
If you want to implement this system without creating everything from scratch, these file folder activities include multiple sorting tasks at different difficulty levels. You can use them across all three instructional levels. Or grab them from my TpT Store here: Prepositions File Folders and Quantity File Folders.
The key is having materials that are flexible enough to work at different stages of learning—from building independence to teaching discrimination to maintaining mastery. One set of folders, three levels of instruction, endless differentiation possibilities.

![Summer resources to help survive the end of the year in special education [picture-interactive books with summer themes]](https://autismclassroomresources.com/wp-content/uploads/2018/05/SUMMER-RESOURCES-ROUNDUP-FEATURE-8528-768x768.jpg)
