Welcome to the Autism Classroom Resources Podcast, the podcast for special educators who are looking for personal and professional development. I’m your host Dr. Christine Reeve. For more than 20 years, I’ve worn lots of hats in special education. But my real love is helping special educators like you. This podcast will give you tips and ways to implement research based practices in a practical way in your classroom, to make your job easier and more effective.
Welcome to the Autism Classroom Resources Podcast. I’m Chris Reeve. AndI’m your host, and you are listening to Episode 201. And in this episode, I am talking about how to get started with an independent work box system. And this kicks off a series for this month that will take a somewhat deep dive into independent work systems and building independence with your students.
Now some people call them task boxes or task box system. Their research base name is structured work systems, but I primarily call them independent work systems, because they are specifically designed to teach a student to work on a series of tasks independently and complete them. And there are very specific characteristics that we’ll talk about specifically in a later episode.
But today, I’m going to talk about how you get started. What do you need to know, what materials do you need, how do you get set up. Now if you want a deeper dive, I’ve got a free webinar on independent work systems that you can access at autismclassroomresources.com/iw-webinar. And I’ll also put that in the show notes.
If you’re looking for a toolkit to get you set up that has a tutorial, pictures, and all the tools that you need, check out the starter kits or the starter bundles in my store for independent work. And you can find everything you need for independent work at autismclassroomresources.com/independentwork.
And in addition, just to get this out of the way, I picked this topic this month, because it is our theme for the Special Educator Academy. And that means that my Independent Work Starter Kits and some of the tasks are available as part of the membership after you finish your trial. And I’ve curated all of our content on work systems to walk you through an efficient set of tools to get started, or to refine your work systems, and to train your staff to use work systems, whatever works for you at your stage of development with your classroom. And you can find all about that at specialeducatoracademy.com.
So today is going to start on focusing on getting started. So I’ll talk about the materials that you need, the important information about the structure of the system itself, and in later episodes, I’ll be talking about troubleshooting, about ways to bump up the difficulty, and how to use them in different settings and a lot more. So let’s get started.
Let’s start off with the materials that you need to make an independent work system. Now I’ve got a blog post. And I’ll put that in the show notes that lists out all of these in more detail. And it’s got links of where you can find them, the most cost effective options that you have.
First, you need boxes for the tasks. The primary characteristic of the boxes are that they need to be able to hold the whole task itself. And the box itself needs to fit in the finished box. And I’ll talk more about that later.
You also want your boxes to be somewhat durable. Now they can be small, or they can be large, depending on the size of the task. So I might have a recipe box for some, I might have some in a notebook, and I might put that in a shoe box. The easiest way to get started quickly if you’ve got some funds is to use plastic shoe boxes like Sterlite boxes, and you can find some at the Dollar Tree you can find them at the Walmart.
I find the Walmart ones often are cheaper when you buy them in bulk and it gives you a quality that will last. The Dollar Tree ones are great, but they don’t always last as long. I particularly like the Sterilite boxes because they’re pretty consistent and they’re pretty sturdy. Feel free to share the blog post in the shownotes with your admin when they ask you when you want to buy 20 shoe boxes if you’re planning to organize your closet because yeah, I’ve had principals asked me that when I have designed classrooms.
But the cheapest way to put a system together is also if you don’t have the money to purchase them, to save up containers around your house. You can use regular cardboard shoe boxes. You could use any other type of carton or container that will hold the Fold task itself.
Now a couple of weeks ago, in Episode 198, I talked about how to start independent work with students who don’t have any independent work systems. So if you have students like that that might be useful resources. For them, sometimes we use what we call shoebox tasks, where all the task elements are in the box itself. So all the containers are actually set often into the top of the box.
I’m going to put a link to a YouTube video on my YouTube channel that has an example and a tutorial about how to create some of those kinds of tasks if you need those. Generally, I start with 20 shoe boxes when I’m setting up a classroom, depends on how many students you have and how many work systems you’re going to have.
In addition to the shoe boxes, you need a large finished basket. The finished basket is where the material goes completed, staying completed into that basket. I typically will use a laundry basket. But again, it could be something like a copy paper box carton that all the paper comes for in the copy room, it could be any kind of large carton like that. It just needs to be big enough to hold multiple tasks that might be shoebox size, all at once. So you want the student to be able to put all of their finished tasks into that basket when they’re doing the system. And then you can reset it.
You also want to get some kind of smaller containers that are going to hold materials in the tasks. And I’ll talk more in a future episode about why this is important. But you want to make sure you’re organizing within your tasks as well. Now you can use margarine containers, butter containers, deli soup containers, Pringles chip cans are great. If you can get metal coffee cans, those are amazing, but they’re very hard to find now. I really liked them for putting tasks because they have a smooth top, unlike the plastic kind. And that allows me to put clothes pins on them and things like that.
For all of you new moms out there, baby food containers are really helpful for small containers. You can also use pudding cups. Those are great, especially if you’re making new shoe box tasks where you want to inset the task into the box.
You also can use sorting trays like silverware sorters, round chip trays with the dip cup in the middle are great first sorting, and egg cartons and ice trays are really great for one to one correspondence. And you’ll see all of these kinds of materials used on my YouTube channel in my Tuesday Tips videos, and I’ll link to one of those so you can see those.
You also need velcro or something to put the schedule together. And often you want to put Velcro on some of the tasks in the bins as well. I can make a schedule without velcro using paper clips. Because scarily enough, I predate using Velcro as much in the classroom. But sometimes you really need it to temporarily hold the task pieces together when the student puts them in the finished box, because you want their tasks to be put away completed, you do not want them to reset the task. And we’ll talk about that in a future episode, too.
You also need a system schedule. Now schedules are really important because they allow you to grow the system. I talked in Episode 198, about the fact that for some of our students, you might not start with the schedule but you want to start that schedule as soon as you can. Because that allows you to turn your work system eventually into a to do list.
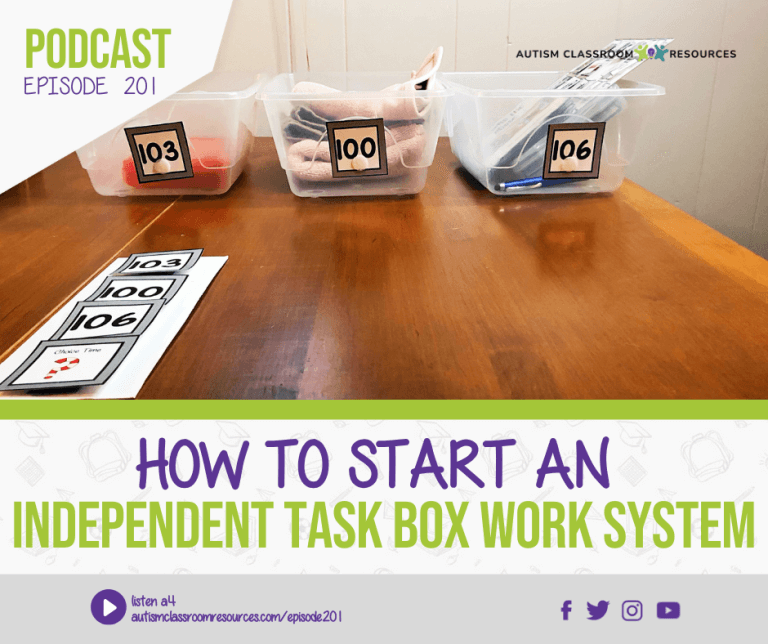
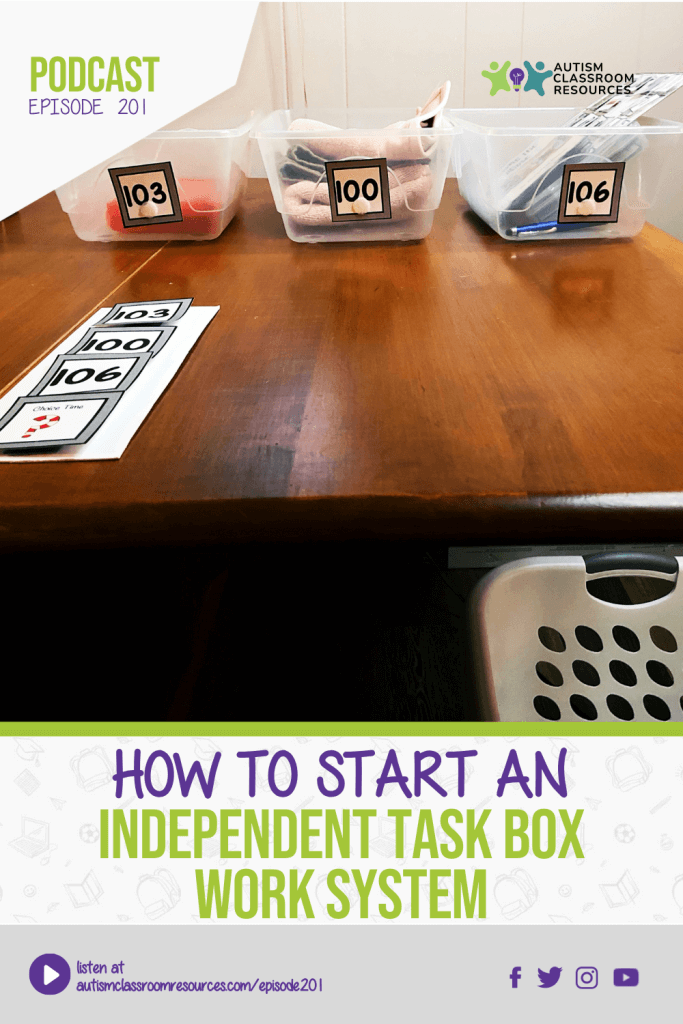
And the students are typically going to start out matching a picture from the schedule to an identical picture on the basket. They can be colors, they can be pictures, they could be letters, they could be numbers. Eventually, I really like to get to numbers.
If you’ve got my starter kit, it’s got tons of different kinds of schedules in there for the different age groups. And there are really two criteria that you need to use to decide what kind of schedules to use, they need to be something that the student either knows how to match. Or you can start with something basic like matching colors. Some people make different types of visuals for different types of tasks. That’s a project down the line. Don’t worry about that right now.
Right now let’s just get started. I usually start with just colored visuals, or if my students can match numbers, I start with numbers, because it’s easiest to number all the baskets in my system. You want to make sure that you have two have each of those schedule visuals, because one is going to go on the schedule and one is going to go on the bin. And you’re going to take the visual off the schedule and you’re going to actually Velcro it on top of the one on the bin. So you want to make sure you’ve got two have each one.
Next up you need to know what your reinforcers are for each student and what they’re going to get for completing their system. And then you want to have pictures of them. Those are going to go into what’s next at the end of the schedule. For students that aren’t yet using pictures, they’re not able to really understand what pictures mean, I’ve actually used something like a closed Tupperware container. And I actually will put the reinforcer in that container, it’s closed, they can’t necessarily get it open. Sometimes I’ll tape it shut if I need to. And I will Velcro that at the end of their schedule, so they can actually see what they’re working on.
The whole key to independent work systems is this visual component that helps students organize and understand what the expectations are.
So those are the basic materials that you need for the system itself, you can find many of them already in your classroom. And I have an episode coming up on the task boxes themselves, and the tasks that go into them. So I want to jump today, I don’t want to talk about the tasks, I want to talk about what the system needs to look like that the tasks are going to go into.
Now, it’s important to know that a true structured work system or independent work system is different than just a bunch of tasks boxes put together. It is specifically designed to answer four questions in structured work. These four questions are, what work needs to be done, how much work needs to be done, what do I need to do? And how much of it do I need to do? How do I know when I’m done? And what am I going to do next?
Those are the four questions that we want to make sure our work systems are always answering, because that is how this visually conveys information to the students about what’s expected. And that means that we really want to make sure that we pay attention to the elements that we use to construct it, and how it’s put together. We want to make sure that we’re following the evidence based practices.
That’s not to say that there aren’t a ton of variations we can have. And I actually have an episode coming up this month, on how we advance our work systems and change the look of them as our student’s skills evolve. But we want to make sure that we’re always looking at the system, no matter how it looks through this lens. This isn’t the only way that a work system can be set up. But it is how I get started.
So let’s talk about the steps of what goes into an independent work station. Step one, you want to think about how many workstations you’re going to have. Now, there are different ways to do independent work, you could do it where every student has their own work system. But I find that most classrooms don’t have space for this to have a dedicated work system for each individual student. So I tend to run them through centers. And I have a blog post about that, that I’ll share as well, where multiple students are sitting in an independent workstation and they’re rotating through it.
So you want to think about your class schedule, and how many kids you have in your groups, and the physical layout of the room, to identify how many workstations you’re going to need to be running simultaneously at one time.
You want to make sure that there’s a desk or a table or a part of a table for each independent work system so you could take a table and divide it up. But you want to make sure that you’ve got the space and the setup for that number of students working at the same time. I generally will then have different students work in that same spot. And I will switch out the tasks.
So then you want to select your location for your workstations. You want to find a spot in the classroom that is ideally separate from other areas that you use for say, teacher instruction. I like to have the cues be very clear that this is where you work independently. And this is where you work with me on things you don’t know yet. And then you want to make sure that you’re setting up your work systems so that you’re limiting distractions. So maybe the students are facing a wall or facing away from the hubbub of the classroom so that they’re not easily distracted.
Then you want to set up your work systems. So you want to arrange your tables and your desks. So again, we’re minimizing those distractions, and we’re creating a personal workspace. That might mean that for some of our students, we put tape on the table to show where the spaces are divided, if we’re using the same table. It might mean that I’m specific about who goes at which station because maybe I have an independent desk and then two other systems that are set up on a divided table. And at some since situations I might have a panel that I tape between the two systems if I think the kids are going to be too distracted.
Then I want to arrange a strip of soft Velcro on the left side of each workstation where the student’s schedule is going to be. You could put it across the top. But generally you want to decide on whether or not you want to go top tip on them, or left to right, but it needs to be one of those two. But vertical top to bottom is better for earlier developmental stages based on developmental science. And horizontal, left to right can be used for more advanced stages.
Then I want to put the Velcro on the baskets. So I’ve got a strip of soft Velcro on the left side of the table. Because when I set up my schedules, I put the rough Velcro on the back of the card, and I put the soft Velcro on the surface. So I call that hard on the card soft on the surface, you want to be consistent across your classroom for just ease of use.
So I place all the the rough Velcro on the back of the visuals. And that means that I’m going to put a piece of soft Velcro on the end of each task basket. So that’s going to allow me to take the visual that has the rough Velcro on it, put it on there, it’s going to have soft Velcro on top of that visual as well, because then I’m going to take the schedule card and match it right on top of that. So that you can, the student is going to actually take the visual, match it to the top of that visual, and it’s going to stay attached when they put it away.So you’ve got rough Velcro on the back of each visual and soft Velcro on the table and on the front of the task box.
So then you want to put your schedule together. You want to organize the visual schedules on the Velcro strip in a sequence that corresponds with the basket visuals. Now when we’re first starting with work systems, I generally will start with them in front of the student so all the student is doing is sitting in their seat or standing up and taking the visual from their left and putting it on the first basket to their left. And then they do that basket, they put it in the finished basket. And then they take the next scheduled visual off and they mount it to the next one to the right of that first one.
So they’re working from left to right. You always want to make sure that your students are working from left to right and top to bottom because of literacy. But also because it allows for a consistency and a way for them to learn how to do things in a consistent manner.
Next up, you want to put your baskets together. Now the number of baskets that you’re going to have is going to depend on your students, as I talked about in episode 198. For some of your students, you may be starting with one basket, and that’s perfectly fine. And you may even have them matching the visual to the first basket doing it getting the next the reinforcer, and then doing it again.
But a lot of times, if my students have some independent work systems already, I often will start with three baskets on the table, it just seems to be a general number. The number of baskets you have is going to depend on the independence of your students. If you put three out and they’re not able to finish three, then you would reduce it.
For some of our students, we’ll get to the point where they’re traveling and so I might put it on a shelf next to them. I generally want to be able to store my work system tasks in the same area as my work systems themselves, because it makes it easy to set them up and reset them as the center goes on.
So again, you’re going to decide how many baskets each student is able to do in a series. And you may have to do that through some trial and error when you first get started.
So that’s quick and dirty review of how to put the work systems together. In the coming weeks, I will be sharing how we vary these elements to meet the different needs of our students. And I’ll share some stories and some solutions for some common issues and problems that we run into as well.
Now, when you’re setting up your systems, you’re going to make a bunch of tasks. You can find resources for tasks on my blog, on my YouTube channel, of all different really cheap tasks that you can put together, I have some that you can buy that are already, all you do is print them and put them together for some more advanced tasks. But you’re going to find the tasks that the students are able to do. And we’ll talk about the characteristics of the tasks in an upcoming episode.
But it’s important that we recognize that we are fitting these to the needs of the students based on what they’re able to do independently. So when I set them up as centers, one of the things that I might do is I might have a high center, a mid center, and a lower center. And all I mean by that is not the overall skills of the students, but the really independent student, the middle independent student, and the student who had the least independence. And that might be where I slot them. And then I often will label the areas with the students name so everybody knows who goes there. And I start with that and then I individualize from there.
So if you have any questions or comments about independent work systems, or just the podcast in general, feel free to pop over and leave me a comment on tick tock @autismclassroomresources is my TikTok name and I will be sure to try and help and I will try to make sure that I put up examples of work systems there as well.
If you want an in depth overview with images, check out the Free Independent Work webinar at autismclassroomresources.com/iw-webinar. And you can grab all my work system materials and bundles and work tasks in my TPT store at autismclassroomresources.com/independentwork.
Finally, if you want to save some money, and you’re looking for resources and tools to get started, come join us in Special Educator Academy for the month of February 2024, when we are talking all about independent work, and you can grab free tools that come from my store, get it set up all at once once you’re past your trial, plus a lot more training resources for you to take advantage of. So you can also join without a free trial so you can get right to the downloadable printables. And you can find out more at specialeducatoracademy.com.
I hope that you’ll join me next week when I’m going to talk about the characteristics that we need to think about with our independent work tasks, because the system is just the structure for the task, but they have very specific characteristics for the tasks that make them suitable for a work system based on the research as well. So come back and join us then and until then, have an amazing week and I’ll talk to you later.
Thanks so much for listening to today’s episode of the Autism Classroom Resources podcast. For even more support, you can access free materials, webinars and Video Tips inside my free resource library. Sign up at autismclassroomresources.com/free. That’s F-R-E-E or click the link in the show notes to join the free library today. I’ll catch you again next week.